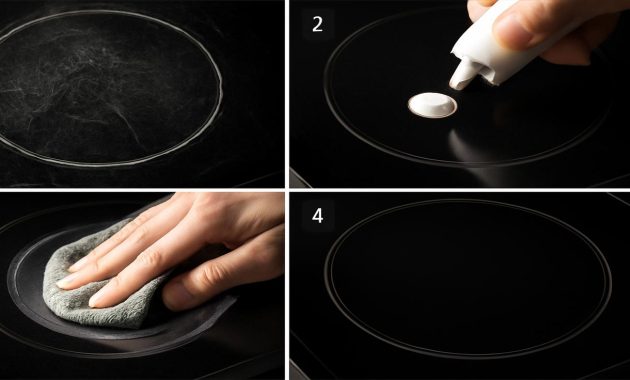
The first time you notice it, it’s just a pale line catching the late-afternoon light across the cooktop. You pause, fingertips hovering over the smooth glass-ceramic surface that has always been the quiet, shiny centerpiece of your kitchen. It used to reflect everything: the copper pot simmering with soup, the green of the basil on the windowsill, the blur of family moving in and out. Now, in the right angle of sunlight, that smooth black field is interrupted by a faint, stubborn mark. A scratch. Maybe several. Maybe one long, wandering scar that tells a story of an overfull cast-iron pan, or a pot dragged instead of lifted in a moment of hurry.
For a second, the scratch feels like a judgment. Proof that you didn’t take quite enough care. That your sleek, minimalist cooktop is slowly surrendering to the chaos of real life: pasta water boiling over, sugar bubbling too high, grains of salt trapped underneath heavy pans. But then you lean closer, run a nail across the mark, and wonder: is it really permanent? Or can this glass-ceramic skin be coaxed back, smoothed out, made to shine again?
The Quiet Stories Written in Scratches
Scratches on a glass-ceramic cooktop rarely appear with drama. There’s no loud crack, no shattering sound, no cinematic slow-motion break. Instead, they arrive like whispers. One day you wipe the surface as usual, and the cloth catches just slightly. Or the light shifts, and a network of faint trails glows against the dark surface. These lines are made of habits: sliding a pot instead of lifting it, cooking with gritty residue under the pan, using the wrong kind of sponge—tiny, thoughtless movements that add up over time.
Glass-ceramic isn’t like ordinary glass. It’s tough, designed to withstand changes in temperature, to glow red-hot beneath and then fade back to cool, opaque black. But toughness doesn’t mean invincibility. Any harder material—sand grains, mineral deposits on the bottom of a pan, even a stray crystal of salt pressed under heavy cookware—can drag across the surface and carve a visible track.
Some of these tracks are shallow, living in the residue that coats the cooktop, not in the glass-ceramic itself. Others sink a bit deeper, catching your nail, your eye, your annoyance. And a few, the truly deep ones, are less about looks and more about safety: signs that the material has been stressed, perhaps too close to its limits.
But most scratches we meet in our kitchens live in that gray area between ugly and dangerous. They bother us because the cooktop is so visible, so central, so unforgiving of blemishes. And that’s where the small ritual of careful repair comes in—a way of reclaiming the surface, and maybe even the quiet pleasure of cooking on something that looks loved, not ruined.
Before You Begin: Reading the Surface
Stand in front of your cooktop for a moment and really look at it. Turn off the overhead lights and let a softer side light—maybe from a window or a small lamp—slide across the surface at an angle. This is when the scratches declare themselves most clearly, like topographical lines on a map.
Try this little test with your fingertip: move your nail across each scratch you can see. If your nail doesn’t catch at all, the “scratch” may be nothing more than hardened residue—sugar syrup, burned-on sauce, or mineral stains. That’s good news; it means what you’re seeing is on the surface, not in it.
If your nail snags or hesitates, it’s likely a genuine scratch in the glass-ceramic layer. If it catches deeply, and you can almost feel an edge, then the damage may be too pronounced for simple polishing tricks. Repairs can improve how it looks, but they won’t completely erase it. Knowing this ahead of time keeps expectations grounded: you’re aiming for “significantly better,” not necessarily “brand new.”
Now, picture yourself moving through the next steps as a kind of quiet, careful craft. You’re not just scrubbing; you’re restoring a surface that holds the heat and heartbeats of everyday cooking. And it’s easier than it sounds—especially if you follow a few simple, thoughtful steps.
Step 1: Cooling Down and Clearing the Stage
Every good restoration starts with patience. If the cooktop has been in use, wait until it’s completely cool. Not warm, not almost cool—truly room temperature. You’ll be working close to the surface, maybe even leaning over it, and you don’t want a moment of distraction to end with a burned wrist or palm.
Once it’s cool, remove everything: pots, pans, stray utensils, even decorative items that sometimes drift onto the surface. Let the cooktop become a bare, blank field again. In quiet kitchens, this is often the only moment it’s truly empty.
Next comes the first clean. This isn’t about the scratches yet; it’s about everything around them. Use a soft cloth or non-scratch sponge with a bit of mild dish soap and warm water. Move slowly, letting the cloth glide across the glass-ceramic, loosening oil films, forgotten splatters, and the invisible grit that may have caused scratches in the first place.
Rinse with clean water and wipe dry with a microfiber cloth, following the lines of the surface. When you’re done, let the cooktop sit for a minute or two, letting any residual moisture evaporate. You want the glass-ceramic completely dry before the next step; water trapped under cleaning products can dilute their power and make polishing smear instead of shine.
Step 2: Shaving Away the Stubborn Layer
Hard, baked-on stains and residue can sometimes pretend to be scratches. They catch the light and the cloth, but under all that stubbornness, the glass-ceramic might still be intact. To find out, you gently shave away that outer crust—not with steel wool or abrasive pads, but with something more precise.
Most cooktop manufacturers recommend a special tool: a razor-style scraper designed for glass-ceramic surfaces. Used respectfully, at the right angle, it works like a miniature plane sliding across a wooden board, removing high spots while leaving the surface beneath untouched.
Hold the scraper at a very low angle, almost flat against the cooktop, and draw it gently toward you in short strokes. Never dig in. You’re not carving; you’re skimming. Focus on the areas where stubborn, glossy patches cling near the scratches. Listen to the faint sound it makes as it glides—a soft whisper when it’s moving over clean glass-ceramic, a slightly rougher tone when it hits scorched residue.
Every few strokes, pause and wipe away whatever the scraper has lifted with a soft, damp cloth. Then dry again. As the residue disappears, some of the “scratches” may vanish with it, revealing that they were never wounds in the glass-ceramic at all, just scars of old spills.
Once you’ve done this gentle shaving and cleaned again, look closely. What remains—the lines that still catch the light—are the ones that truly need polishing attention.
Step 3: Polishing the Surface with Care
This is the step where the transformation begins to show. You’re not sanding, and you’re not attacking the glass-ceramic; you’re coaxing the surface into a smoother, more uniform reflection. To do this, you’ll need a dedicated glass-ceramic cooktop cleaner or a very mild, non-abrasive cleaner designed for smooth glass surfaces.
Squeeze a small amount—about the size of a hazelnut—directly onto the scratched area. A little goes a long way. With a clean, soft microfiber cloth, start working the cleaner into the surface. Use small, overlapping circles, as if you’re gently buffing a mirror. Your hand movements should feel more like polishing a favorite piece of stone than scrubbing a dirty dish.
As you polish, you’ll notice the cleaner begin to haze over. That’s what you want. This thin, milky film is a sign that the fine polishing agents in the cleaner are doing their job, smoothing minuscule irregularities and blending the edges of the scratch with the surrounding glass-ceramic. Keep your pressure even—firm enough to be effective, but never so hard that you feel like you’re grinding the surface.
Work over the scratch for a minute or two at a time, then stop and wipe away the residue with a clean, slightly damp cloth. Dry the area with another microfiber and lean down to inspect your work. Some scratches will already look softer, less defined. Others, especially the deeper ones, may still be visible but less sharp, less glaring.
If needed, repeat the process: a bit more cleaner, a bit more circular polishing, another careful wipe. Think of it like tuning a musical instrument: small adjustments, repeated patiently, often produce the best results. You’re not chasing perfection so much as harmony—reducing contrast so your eyes glide over the surface instead of snagging on every imperfection.
Step 4: Finishing Touches and Gentle Protection
After polishing, the cooktop often looks subtly different—not just cleaner, but calmer, as if the surface has taken a deep breath. Now comes the finishing step: sealing in that care with a final, thin layer of protection.
Some glass-ceramic cleaners double as protectants, leaving a nearly invisible film that makes future spills easier to wipe away and helps prevent micro-scratches from tiny grit. If your cleaner has this function, apply a very small amount to the entire cooktop, not just the scratched area. Again, spread in gentle circles with a soft cloth, then buff lightly until the surface looks uniformly glossy, not streaky.
This thin protective film doesn’t make your cooktop scratch-proof, but it does help everyday wear glide over more softly. It also gives the glass-ceramic that subtle, almost velvety sheen you might remember from the first day it was installed.
As you stand back and admire the result, you may notice that some scratches are still faintly visible under certain angles. That’s okay. You’ve softened their edges, restored much of the smoothness, and added a layer of care that will slow further damage. Not every mark has to disappear for the surface to feel beautiful again.
Living with Your Cooktop: Habits That Prevent New Scratches
Once you’ve invested time and attention into removing scratches, it’s natural to move a little differently in your kitchen. You may start to notice the sounds your cookware makes when it meets the cooktop, the tiny grains of salt that ping against the glass-ceramic, the habit of dragging instead of lifting. These details are where prevention quietly lives.
There are a few simple habits that, over time, can mean fewer new marks and less time polishing:
- Lift, don’t slide: When you move a pot or pan, pick it up. Even a small shift can drag grit across the surface.
- Check the bottoms: Run a hand over the underside of your cookware now and then. Feel for rough rings, burrs, or burnt-on residue and clean or replace pans that feel abrasive.
- Wipe before you cook: A quick swipe with a dry microfiber before turning on the heat can catch stray crumbs or crystals.
- Avoid harsh tools: Steel wool, gritty powders, and rough scouring pads carve more than they clean.
- Respect the heat: Don’t place icy pots straight onto a red-hot burner zone; sudden temperature shocks can stress the material.
These small rituals don’t turn the kitchen into a museum. They simply weave care into motion, making it less likely that your next big cooking project ends with a fresh set of scars.
A Quick Comparison of Scratch Types and What You Can Do
When you’re standing at the stove, it helps to know which marks you can tackle confidently and which ones might ask for professional advice. Here’s a simple, mobile-friendly overview:
| Type of Mark | How It Looks/Feels | What Usually Helps |
|---|---|---|
| Surface residue | Dull streaks, nail does not catch | Warm water, dish soap, soft cloth |
| Baked-on spills | Hard, glossy patches, slightly raised | Razor scraper at low angle, then cleaning |
| Light scratches | Visible in angled light, nail barely catches or not at all | Cooktop cleaner, microfiber polishing |
| Moderate scratches | Clearly visible lines, nail catches | Repeated gentle polishing, protection layer |
| Deep or star-shaped damage | Edges you can feel clearly, possible radiating cracks | Stop heavy use, consult manufacturer or service |
When a Scratch Is More Than a Scratch
Most marks on a glass-ceramic cooktop are aesthetic, not dangerous. They don’t affect how the stove heats, how your food cooks, or how safe the surface is under normal use. But there are a few red flags that ask for more attention than a cleaning cloth can offer.
If you see cracks branching out in thin, white lines—especially from one central impact point—this could signal structural damage. Star-shaped patterns, chips along the edge, or an area that seems to sit slightly lower than the rest are all clues that the material has been physically stressed. Deep grooves where your nail almost sinks in, or a spot that seems to discolor around a scratch when heated, deserve respect and caution.
In those cases, polishing won’t fix the underlying problem. It may make the mark look better, but it doesn’t restore the internal strength. When the cooktop tells you a story of force—a heavy pot dropped from a height, an object falling from an overhead cabinet—it’s often time to pause, reduce use, and reach out to a technician or the manufacturer’s support line. A replacement top is an investment, but one that guards against sudden failure under high heat.
Still, for the vast majority of the fine lines and quiet streaks that appear in everyday kitchens, the four simple steps—cool, clear, shave, polish, protect—are enough. They turn the cooktop from something to apologize for into something you can enjoy leaning over again, watching water come to a boil on a surface that feels cared for.
Letting the Surface Tell Its Story
In the end, a glass-ceramic cooktop is not meant to stay untouched. It is meant to host rushed breakfasts, experimental dinners, midnight teas, and Sunday feasts. Every time you cook, you write a bit more of your household’s story onto that dark, reflective plane. Removing scratches where you can is part of the care, but so is accepting that some faint lines will remain—like laugh lines around the eyes of a friend who has shared many years with you.
Run your hand across the surface after you’ve finished the four steps. Feel how it responds: smoother, cleaner, more even under your fingertips. Maybe the worst of the scratches have faded into the background. Maybe a few are still there, almost like old pencil marks beneath fresh ink. The cooktop isn’t brand new anymore, but it is yours—shaped by your habits and now, by your intention to care for it.
Next time you set a pot down, you might lift and place it a little more gently. Not out of fear, but from respect for the quiet work this surface does, day after day, holding the heat that feeds people you love.
FAQ: Scratches on Glass-Ceramic Cooktops
Can scratches on a glass-ceramic cooktop be completely removed?
Light and shallow scratches can often be minimized so much that they’re barely visible in normal light. Deeper scratches, however, usually cannot be completely erased. Polishing can soften their edges and make them less noticeable, but some marks will always remain faintly visible.
Is it safe to keep using a scratched cooktop?
Yes, in most cases. Superficial scratches are mainly a cosmetic issue and don’t affect safety or performance. However, if you see cracks, chips, or star-shaped damage, or if a scratch feels very deep, it’s wise to reduce use and consult a professional or the manufacturer.
Can I use baking soda or toothpaste to remove scratches?
Baking soda and non-gel toothpaste are mild abrasives and sometimes recommended in home remedies. They can help with surface stains but may leave a haze or micro-scratches if used too aggressively. A cleaner specifically designed for glass-ceramic cooktops is usually safer and more effective.
Will a scratch get worse over time?
The scratch itself doesn’t usually spread like a crack, but dirt, residue, and abrasives can accumulate in and around it, making it more visible. Gentle cleaning, polishing, and avoiding harsh tools help prevent the area from looking worse.
Can I use a regular razor blade to scrape my cooktop?
Only if you use it carefully and at a very low angle. Dedicated cooktop scrapers are safer because they’re designed for glass-ceramic surfaces. Always use a new, clean blade, hold it almost flat against the surface, and avoid digging or prying motions.
How often should I polish my glass-ceramic cooktop?
For normal home use, a light polish with a glass-ceramic cleaner once every one to two weeks is usually enough, with simple daily wiping after cooking. If you cook heavily every day, you might polish more often, always gently.
Will a protective coating make my cooktop scratch-proof?
No coating can make a glass-ceramic cooktop completely scratch-proof. Protective polishes can help reduce friction, make spills easier to clean, and slightly improve resistance to fine marks, but good habits—lifting pans, cleaning gently, checking cookware bottoms—remain your best protection.