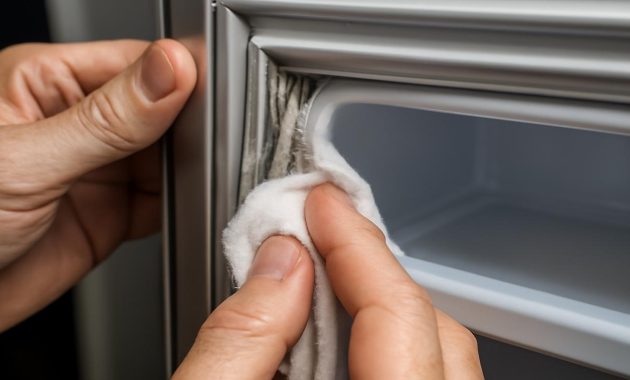
The first time you notice it, it’s just a shadow in the corner of the fridge door. You tell yourself it’s nothing—maybe a smudge, maybe dried sauce. You wipe at it with your thumb and it doesn’t budge. You lean closer. The rubber seal that frames your fridge like a quiet guardian is no longer just pale and clean. It’s speckled, freckled, almost furred with tiny black and gray dots. Mold. And once you see it, you can’t unsee it. Every time you reach for milk or leftovers, it’s there, waiting in the fold of the seal, whispering the same nagging question: how clean is this fridge, really?
The Secret Life of Your Fridge Seals
Fridge seals are like the unsung heroes of your kitchen—until they start to fail. These rubber gaskets are designed to keep cold air in and warm air out, pressing tight every time the door closes. But what they also do, quietly and consistently, is collect crumbs, drips, condensation, and microscopic life. They’re like tiny valleys and ravines, lined with ridges where moisture tucks itself away and food particles cling just out of sight.
Mold loves exactly what your fridge seals offer: darkness, moisture, and organic matter. Whenever you open the door on a warm day, a puff of humid air slides in and condenses in the cool folds of the gasket. A bit of juice from a leaky carton runs down, vanishing into the groove. A dab of jam from someone’s sticky hand transfers into the rubber’s creases. You close the door, satisfied, and the mold gets to work while you forget it exists.
The mold isn’t just about looks. Over time, a badly infested gasket can become less flexible, less elastic. Cracks can form. The seal can loosen, letting more warm air sneak into the fridge, forcing the motor to work harder, nudging your electricity bill upward. You may notice the faint smell first, a stale, sour edge in the air every time you open the door. Then you start to think about what that mold might be brushing against—containers, fingers, food that sits close to the door.
So cleaning your fridge seals isn’t just about satisfying a craving for neatness. It’s about creating a small, quiet barrier against the things you don’t want near your food or lungs. And if you do it right, you won’t just erase the mold you see. You’ll stop it from coming back.
Preparing Your Little Cleaning Ritual
Before you start scrubbing, pause. This is not a job you want to rush, furious and armed only with a random spray bottle and hope. The seals are delicate enough to be damaged by harsh chemicals and stiff brushes, and mold spores are stubborn enough to return if you half-heartedly swipe and walk away. Think of this as a ritual—simple, methodical, and oddly satisfying when you do it with intention.
You’ll want to gather a small, careful set of tools. Nothing too aggressive; this is precision work in rubber canyons. A soft toothbrush. A bowl. A few clean microfiber cloths. Cotton swabs for the narrowest folds. Then the cleaners: simple, kitchen-friendly ingredients that are strong enough for mold, but gentle enough for the gasket.
| Item | Purpose |
|---|---|
| Warm water | Dilutes cleaners, loosens grime. |
| Mild dish soap | Breaks down grease and sticky residues. |
| White vinegar | Helps kill mold and neutralize odor. |
| Baking soda | Gentle scrub, deodorizer, dries moisture. |
| Soft toothbrush & cotton swabs | Reaches into folds without tearing rubber. |
If the infestation is heavy—dark patches, slimy residue, the kind of growth that makes your nose wrinkle back—consider a pair of gloves and even a simple mask, especially if you’re sensitive to mold. Open a nearby window if you can. This doesn’t have to be dramatic, but a bit of fresh air never hurts when you’re disturbing spores.
Now, power. Fully unplugging the fridge is ideal if it’s practical and safe for what’s inside, but at minimum, turn off any child-lock alarms that scream when the door is open too long. You’re going to be holding this door open for a little while, and it helps if the only sound is the gentle swish of your cloth and the quiet clink of your bowl against the counter.
Step-by-Step: Deep Cleaning the Hidden Creases
When you stand close to the fridge and look at the seal, notice its design: the smooth outer edge that kisses the door frame, and the inner folds like the pleats of a curtain. Mold doesn’t live on that flat outer surface alone; it sleeps in the folds, protected from casual wiping. That’s where you’re heading.
Mixing Your Cleaning Solution
In a small bowl, mix warm water with a few drops of mild dish soap and a generous splash of white vinegar. You’re aiming for something that feels slightly slick between your fingers, smells faintly sour, but not overwhelming. Rough proportions could be one part vinegar to three parts water, with enough soap to make a soft foam when swirled.
Set another bowl aside with plain warm water. This will be your rinse station, washing away not just the grime but the loosened spores and residue so they don’t resettle in the same spot.
Loosening the Grime Without Hurting the Seal
Dip a cloth into the soapy-vinegar mixture, wring it until it’s damp but not dripping, and gently run it along the visible parts of the gasket. You’re waking up the dirt first, coaxing it to let go. The goal at this stage isn’t perfection. It’s softening—so that when you go in with more detail work, you’re not grinding grit into the rubber.
Now, use your fingers to gently pull back the seal where it overlaps the door. You’ll feel the give—elastic, slightly tacky with moisture. In the inner groove where the seal meets the body of the fridge, that’s where dust, crumbs, and mold like to huddle. Dip the toothbrush into your solution, tap off the excess, and sweep it along the inner fold with short, patient strokes. Not aggressive scrubbing—just a steady massage, enough to disturb the mold without tearing the rubber.
Detailing the Corners and Stubborn Spots
Corners are where mold stages its quiet little revolutions. They’re also where seals can weaken if you’re rough. Switch to cotton swabs for these areas. Dip, squeeze, swipe. You may notice the cotton tip turning gray or brown; that’s years of neglected residue leaving the stage. Replace swabs liberally. The more often you change them, the less you smear old mold around.
For spots that seem stained rather than freshly moldy—where the black or gray color lingers despite cleaning—you can lean on baking soda. Sprinkle a pinch into your palm, then mix with just enough of your cleaning solution to form a soft paste. Smear it gently onto the stained area and let it sit for 5–10 minutes. The baking soda works as a soft abrasive, nudging away discoloration without slicing the rubber like harsher powders might.
Return with your toothbrush and a bit of fresh solution, brushing lightly over the paste until it dissolves. Then wipe with a damp cloth dipped in clean water. You should see the rubber emerge a little brighter, the color more uniform, the dark freckles softened or gone.
Rinsing Away the Past
Cleaning is only half the story. Rinsing is what prevents yesterday’s dirt from becoming tomorrow’s film. Once you’ve worked your way around the entire seal—outer edge, inner fold, corners—go back with a fresh cloth soaked in plain warm water and wrung thoroughly. Wipe every surface you touched. Let another cloth follow, this one dry, catching whatever the first one left behind.
Running your fingertips along the seal now, it should feel less tacky, less gritty. Just slightly rubbery, cool to the touch, and free of slimy patches. The smell around the door should be quieter, too—fewer sharp or sour notes, more of that neutral, barely-there “cold air” scent that good fridges have.
The One Step Everyone Skips: Drying and Conditioning
Here’s where most cleaning routines fail and where mold wins its quiet rematch: moisture left behind. Even the gentlest cleaning solution, if allowed to sit in folds and corners, becomes a shallow, damp pool—exactly what mold is waiting for. The spores that survived or drifted back from the air will find those damp creases, and in a few weeks, you’ll see familiar dots reappearing like an old habit.
After rinsing, give the seals your full attention with a dry, absorbent microfiber cloth. Press the cloth gently into every groove, lift the folds again, revisit the corners. Don’t just swipe the visible surface; dab and pat like you’re drying a delicate leaf after rain. You can even roll a corner of the cloth into a loose “rope” and slide it along the groove to soak up lingering moisture. If a hair dryer is handy, set it on the coolest, gentlest air setting—not hot—and pass the air along the seals from a short distance to help evaporate any last dampness.
If your seals look a bit dull or stiff after cleaning—especially on older fridges—you can add a tiny touch of conditioning. A thin smear of food-safe petroleum jelly or a silicone-based gasket conditioner (applied very sparingly) along the outer edge can help the seal remain flexible and maintain its snug contact with the door frame. Wipe away any obvious excess; you want slip, not slime. Conditioner keeps micro-cracks from forming, and fewer cracks mean fewer tiny pockets where mold can nest.
How to Keep Mold from Coming Back
Once your seals are clean and dry, the next challenge is time. Mold doesn’t reappear because you cleaned badly; it comes back because its perfect conditions quietly return. The real magic lies in changing those conditions just enough that mold can’t get comfortable.
Start by listening to your fridge’s rhythms. Does the door get left open for long stretches while someone debates snacks? Every minute the door hangs ajar invites warm, humid air to rush in and condense on the cold surfaces—especially those pliable rubber seals. Encourage quick decisions in the kitchen: open, choose, close. It sounds trivial, but you’re gently nudging the balance away from moisture.
Next, hunt leaks. That little circle of dried orange juice underneath a carton? The cheese that sweats brine under its plastic wrap? Every slow drip that sneaks toward the door frame ends up in the gasket’s folds eventually. Store liquids in truly sealed containers. Wipe the door shelves when you notice sticky rings. A ten-second swipe after you spot a spill is worth far more than an hour-long mold battle a few months from now.
Then, think about air circulation inside the fridge. An overstuffed fridge traps pockets of humidity and warmth. Cold air needs space to move. If food is pressed right up against the door seal, it transfers moisture more easily. Leave a little breathing room around the perimeter where the seal meets the door; imagine a narrow halo of space that belongs only to the gasket.
Finally, set a quiet ritual: a quick monthly check. You don’t need the full deep-clean every time. Once a month, as you wipe shelves or organize leftovers, drag a damp cloth with a touch of vinegar along the seal, then dry it thoroughly. This soft, repetitive attention keeps mold from building a foothold. If you see even a few small dark dots starting to appear, treat them right away instead of letting them become a pattern.
When the Seal Itself Is the Problem
Sometimes, no matter how lovingly you clean, a seal is too far gone. Rubber doesn’t last forever. It splits, warps, pulls away from the frame. You might notice spots where it doesn’t lie flat, where a piece curls outward, or where the inner fold has cracked like dry earth. Mold loves these little fractures; they’re like custom-built caves it can hide in beyond the reach of cloths and brushes.
If you close the fridge door and gently slide a thin strip of paper between the door and frame, it should resist being pulled out in most places. If it slips out easily along a long section of the door, that’s a sign the seal isn’t doing its job. Cleaning will help with hygiene, but not with energy efficiency or long-term mold control. In that case, replacing the gasket may be the most powerful form of cleaning you can do.
Many modern fridges have seals that can be replaced without special tools: they pull out of a groove and snap a new one into place. Others are screwed in or tucked behind trim that’s best handled by a professional. It’s worth checking your fridge’s manual or model number to see what your options are. A fresh, flexible seal closes like a soft sigh and makes everything that came before—your careful cleaning, your new habits—work twice as well.
FAQ: Keeping Fridge Seals Clean and Mold-Free
How often should I clean my fridge seals?
A deep clean every 3–4 months is a good rhythm for most homes, with a quick wipe using a mild vinegar-and-water solution about once a month. If you live in a very humid climate or have frequent spills, you may want to check and wipe them more often.
Is bleach safe to use on fridge seals?
Bleach can kill mold, but it can also dry and weaken rubber over time, causing cracks and premature wear. In a closed food space like a fridge, its fumes and residue are not ideal either. For most situations, a mix of vinegar, mild soap, and baking soda is gentler and effective if you clean and dry thoroughly.
My seals still look stained even after cleaning. Is that mold?
Not always. Sometimes mold leaves behind a light stain even after being removed, and sometimes the rubber naturally discolors with age. If the surface feels smooth, dry, and doesn’t smell musty, it’s likely just cosmetic. Persistent sliminess, fuzziness, or a sour odor suggest active mold, which needs more cleaning or, in severe cases, seal replacement.
Can moldy fridge seals make food unsafe?
Mold on seals doesn’t usually jump straight into sealed containers, but it does affect the air quality around your food and can spread spores inside the fridge. It’s especially concerning for people with allergies, asthma, or weakened immune systems. Cleaning the seals reduces both odor and the risk of cross-contamination from hands or containers brushing against the mold.
How do I know if my fridge seal needs replacing instead of just cleaning?
If the seal is cracked, torn, badly warped, or pulling away from the door frame, cleaning won’t restore its function. Test it by closing the door on a strip of paper; if the paper pulls out easily in several spots, the gasket may not be sealing properly. In that case, replacing it will improve both hygiene and energy efficiency—and make future cleanings more effective.
Originally posted 2026-03-05 00:00:00.