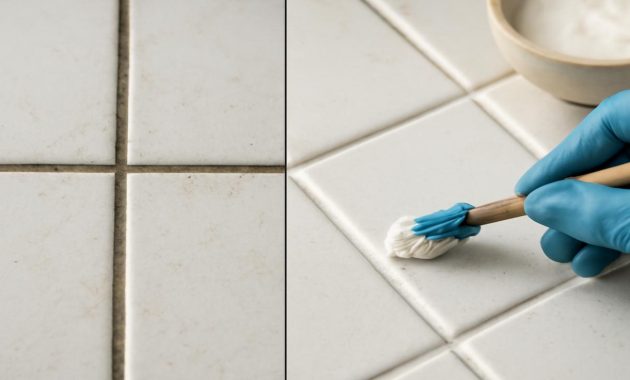
The first time I watched dingy grout come back to life, it felt a little like watching a dry riverbed wake up after the rain. The tiles were the same, the bathroom was the same, the light was the same – but those thin gray lines that had quietly stolen the room’s brightness were suddenly… gone. Replaced by clean, pale pathways that made the whole space feel younger, fresher, somehow loved again. And it all happened with three ordinary ingredients, a bowl, a brush, and fifteen unglamorous but strangely satisfying minutes.
The Secret Lives of Dirty Grout Lines
Grout doesn’t just get dirty – it tells a story. Every footprint, every shampoo spill, every forgotten splash of coffee in the kitchen, every bit of steam that curls up the bathroom walls and sinks into the floor. Over time, the pale lines between your tiles turn into a muted scrapbook of your days: slightly yellow in the corners where water pools, darker where you stand the most, weirdly blotchy near the shower drain.
Most of us don’t notice at first. The change is slow, like erosion on a riverbank. Then one afternoon, sunlight hits the floor at just the right angle and suddenly it’s all you can see: not bright tile and soft reflections, but dingy borders framing every square. You start wondering when exactly your “clean” bathroom or kitchen stopped looking clean at all.
For a lot of people, that’s the moment they start googling harsh chemicals, grout pens, or expensive steam cleaners. But there’s a quieter, gentler route. Three simple ingredients you probably already have in your home can lift that story out of your grout in minutes – like rinsing silt from a stone to find the original color beneath.
The 3-Ingredient Mixture That Works Like Magic
There’s something wonderfully grounding about making your own cleaning paste. It feels a bit like mixing bread dough or stirring a campfire stew: you measure, you pour, you watch textures change under your spoon. In this case, the alchemy is simple and satisfying.
Here’s the basic trio that turns tired grout into something close to brand-new:
| Ingredient | Role in the Mix | Suggested Amount* |
|---|---|---|
| Baking soda | Gentle scrubber & deodorizer | 1/2 cup |
| Hydrogen peroxide (3%) | Brightens & lifts stains | 1/4 cup |
| Dish soap | Cuts grease & grime | 1 teaspoon |
*You can scale this up or down, keeping about a 2:1 ratio of baking soda to hydrogen peroxide, and just a small splash of dish soap.
In a small bowl, you stir these three together. The baking soda goes in first – a soft, fine powder that already smells a little like clean kitchens and open cupboards. The hydrogen peroxide follows, bubbling on contact, waking the mixture up with tiny fizzing sounds. Finally, the dish soap ribbons in, a glossy line that disappears as you mix, leaving you with a creamy, slightly gritty paste. It’s not beautiful in any decorative sense, but it looks capable, like something that knows what it’s doing.
There’s a gentle sharpness to the scent: not overpowering, not chemical-heavy, just a whisper of “this is going to work.” This is your grout-restoring trio – nothing toxic, nothing exotic, just everyday ingredients behaving a little like a professional cleaning crew.
How to Turn 15 Minutes into New-Looking Grout
Imagine kneeling on the bathroom floor on a quiet evening: the hum of the fan, the coolness of tile under your knees, the little bowl of paste by your side. There’s a brush in your hand – maybe an old toothbrush, maybe a small scrub brush – and a line of grout in front of you that has seen better days.
The process is simple, almost meditative:
1. Start with a quick sweep or wipe.
Brush away sandy bits, hair, or loose dirt. You want the paste to meet the grout, not just dust.
2. Spread the paste along the grout lines.
Scoop a bit onto your brush or gloved finger and smear it along a section of grout. It should cling, not run – like frosting a very narrow, very unglamorous cake. Work in small sections: a few tiles at a time so you can keep track of where you’ve been.
3. Let it sit – this is where the magic happens.
Set a timer for around 10–15 minutes. During this time, the hydrogen peroxide is busy loosening stains, the baking soda is nudging away at embedded grime, and the dish soap is cutting through oils and residues that made everything cling in the first place.
While you wait, you might notice a faint fizzing if you listen closely or touch the mixture with the tip of your brush. The air smells just a little brighter, like linens drying in the sun. You’re not scrubbing yet, but the work has already begun.
4. Give it a gentle scrub.
When the timer chimes, go back over the lines with your brush. You don’t need to attack the floor like you’re sanding a boat; the paste has already done most of the heavy lifting. A firm, brisk back-and-forth motion is enough. You’ll see the paste darken as it lifts what was lodged in the grout, turning from pale to murky in a surprisingly satisfying way.
5. Wipe it all away.
Use a damp cloth, sponge, or mop to wipe off the paste. Rinse your cloth frequently so you’re not just pushing the grime around. As you clear the surface, those once-dull lines show their true color again – lighter, cleaner, almost as though someone quietly came in and re-grouted while you weren’t looking.
In a modest bathroom or small kitchen, you really can transform the space in fifteen or twenty minutes. Not a weekend renovation. Not a hundred-dollar project. Just a brief interlude in your day when you decide those lines deserve to look alive again.
The Quiet Joy of Watching a Room Brighten
There’s a moment, after the last swipe of the cloth, when you sit back on your heels and really look. Tiles that had seemed a little tired now look like they belong in a photo. The edges are crisp again. The corners don’t lurk in that uncertain gray. Light bounces off the floor differently – cleaner, less interrupted.
In a bathroom, everything feels fresher. The shower suddenly looks like a place you want to stand in longer, as if the room is now part of the ritual instead of a backdrop you try not to examine too closely. In the kitchen, where maybe flour dust and sauce drips once claimed those grout lines, the floor looks like the start of a new recipe: clear, open, ready for whatever comes next.
There’s something deeply human about this small transformation. Floors are humble things; they hold our weight, our mess, our daily chaos. We rarely thank them. But as you see the revived grout, a quiet satisfaction settles in: you brought something back instead of throwing something away. No need for a remodel. No expensive contractor. Just you, a bowl, a brush, and three things that normally sit quietly in your cabinets.
It’s a reminder that not all renewal has to be dramatic. Sometimes the biggest visual shift in a room happens down at your feet.
Where This Mixture Shines (and Where to Be Gentle)
Like any good story, this simple paste has a few boundaries and quirks you should know before you spread it everywhere.
Best places to use it:
- Porcelain and ceramic tile grout: Bathroom floors, shower walls, tub surrounds, kitchen backsplashes – this is its natural habitat.
- Light to medium stains: Discoloration from everyday life, soap scum, mildew shadows, faint yellowing or grayness.
- Spots that smell musty: Baking soda and hydrogen peroxide together are especially good at erasing those lingering, hard-to-name odors.
Places to pause and test first:
- Natural stone: Marble, travertine, limestone and other sensitive stones can react to acidic or harsh products. While this mix is milder than bleach, always test on a small, hidden patch of grout and avoid scrubbing directly on the stone itself.
- Colored grout: If your grout is tinted, do a spot test. Hydrogen peroxide is generally gentler than chlorine bleach, but it can still lighten some colors if left too long.
Think of this mix like a strong, kind friend: capable, but not meant for every situation. A quick patch test in a corner can save you from surprises. Put a pea-sized blob on a hidden area of grout, wait 10–15 minutes, rinse, and see how it looks when it dries. If it still feels like “you” – just cleaner – you’re good to go.
Keeping the Story Bright: Simple Habits After the Big Clean
Once your grout lines are back to their near-original shade, it’s tempting to just admire them and move on. But like a trail you’ve just cleared of fallen branches, a little regular care keeps it from getting overgrown all over again.
Some small rituals that help:
- Quick weekly wipe-down: When you’re already wiping the bathroom sink or kitchen counters, run a damp cloth or mop over the tiled areas too. Catching spills and dust before they settle into grout makes a huge difference.
- Ventilate after showers: Steam loves grout. Cracking a window, running the fan, or leaving the door open after a hot shower helps prevent the kind of moisture that encourages stains and mildew.
- Spot-clean with a mini batch: If you see a dark patch starting, mix a tiny amount of the paste – just enough for that area – dab it on, give it 10 minutes, and wipe it away. You don’t always need a full-floor session.
- Consider sealing your grout: After a deep clean and once everything is fully dry, a grout sealer (applied according to the product directions) can act like a raincoat, slowing down future staining.
These aren’t big chores. They’re the domestic equivalent of checking the weather before a hike or shaking sand from your boots before putting them away. Little gestures that respect the surfaces that support you.
Why These 3 Ingredients Work So Well Together
There’s a quiet satisfaction in knowing not just that something works, but why. This mix isn’t random; it’s a tiny chemistry lesson happening right on your floor.
Baking soda brings the gentle muscle. Its fine particles are slightly abrasive, giving you just enough texture to scrub without scratching most grout or tile. It’s like very fine sand at the bottom of a clear stream, helping to rub away what doesn’t belong while leaving the stones intact.
Hydrogen peroxide is the brightener and lifter. At the low 3% strength found in most home bottles, it’s milder than heavy-duty bleaches but still strong enough to break down some of the molecules that cause stains. When it bubbles, it’s releasing oxygen – tiny pockets of activity that help loosen what’s been clinging stubbornly in the pores of your grout.
Dish soap is the quiet diplomat between oil and water. Grout collects not only dust and dirt, but also the invisible film of oils from skin, cooking, and bath products. Dish soap grabs onto those oils and lets water wash them away. Just a small amount is enough; any more, and you’re just making extra suds to wipe off later.
Together, the three ingredients form a kind of cooperative. No one is doing all the work alone. And because they’re relatively gentle, you can use them without that chemical-fog headache or the nervousness of splashing something too harsh near your skin or the surfaces you live with every day.
By the time you rinse the paste away, what you’re really washing down the drain is a mixture of loosened dirt, dissolved stains, and the remnants of a small, homegrown experiment that turned out remarkably well.
FAQs About the 3-Ingredient Grout Mix
How often can I use this grout mixture?
For most homes, using it every few months for a deep clean is plenty. Between those times, spot-cleaning small areas or doing a quick wipedown keeps grout from getting heavily stained again.
Is this mixture safe for kids and pets?
Used normally and rinsed well, it’s far gentler than many commercial cleaners. Still, keep kids and pets out of the area while you’re cleaning, don’t let them lick or walk through the paste, and rinse surfaces thoroughly with clean water before they come back in.
Can I store leftover paste for later?
It’s best to mix only what you need. Hydrogen peroxide gradually loses strength once exposed to light and air, so the fresh mixture works best. If you do keep some, seal it tightly and use it within a day or two, but expect it to be less active over time.
Will this remove mold and mildew completely?
It can lighten and reduce mildew stains on grout and make the area look and smell much better. For deeper or recurring mold problems, especially in walls or behind tiles, you may need a stronger treatment or professional help.
What kind of brush works best?
An old toothbrush is often perfect for narrow grout lines. For larger tiled areas, a small scrub brush with firm nylon bristles and a comfortable handle can save your hands and make the job much faster.
Can I use this on floor grout and shower grout alike?
Yes. It works well on both horizontal and vertical grout lines. For shower walls, apply a bit less paste at a time so it clings and doesn’t drip, and be sure to rinse thoroughly afterward.
What if my grout still looks stained after one try?
Very old or deeply stained grout may need a second round. Apply the mixture again, let it sit, scrub, and rinse. If it remains dark even after multiple cleanings, the pigment in the grout itself may have changed over time, and re-grouting or recoloring might be the next step.
In the quiet span of fifteen minutes – mixing, waiting, scrubbing, wiping – you give those slim lines between your tiles a chance to start over. And as they brighten, something else subtly shifts: your sense of what’s possible with what you already have, right there in your own home, waiting to be renewed.